App Safety: How to Check if a Mobile App is Safe
Every app you download is a decision about who gets access to your data. Here's what to look for before you tap install.
Updated May 29, 2026

While it depends on a variety of factors, a typical mobile app development timeline is 20-40 weeks. By planning for your research, specifications, development, and testing stages, you’ll be able to create a realistic schedule for your mobile app development project.
We all have apps we can’t live without, and they’re certainly worth the time and money it takes to develop them. In 2026, the Google Play Store and the iOS App Store are projected to see 143 billion and 38 billion downloads, respectively.
Every application is completely different in its complexity and design, but the basic development steps are similar. Customizing each app’s look, feel, and functionality is what makes the development process so detail-intensive and intricately coded.
Looking for a Mobile App Development agency?
Compare our list of top Mobile App Development companies near you
To help you better understand the course of a typical mobile app project, we’ve outlined the four basic phases of app development along with projected timelines and requirements.
The timeframe for every app is going to be different, varying by complexity, available resources, and budgetary constraints.
Despite the specifics of your situation, most app development projects will require at least the following six phases:
Given this, the average time it would take to develop an app would be between 20 and 40 weeks. Of course, there are several outliers, but these phases should lay the groundwork for your expectations. After reading, you should understand which phases may take a lot of time and which will take less time for your company.
Need help creating an app? Connect with a mobile app development company on Clutch.
If you have ever been involved in software development, the process for building an app is very similar. Ideas are plentiful, but coming up with the “right” idea is key.
Some startups and entrepreneurs will be tempted to get right into design and development, but it’s essential to some time in this planning phase to ask and answer the tough questions about the requirements, purpose, and scope of your product that will determine the app development time needed. This includes:
Take the time to clearly define your app’s purpose. What’s the core idea? What type of app are you building — e-commerce, marketplace, social, or something else entirely? Skipping this step leads to vague direction and wasted resources. You’ll also need to answer foundational questions like:
Discuss these early with your team and app developers to align expectations and prepare for what’s ahead.
Don’t assume your idea is unique — research to confirm it. Search keywords related to your concept in the Apple App Store and Google Play Store. Look for competitors and identify gaps in their offerings. Don’t be discouraged by existing apps; this is your chance to spot what’s missing and plan how your app can do it better with unique features or a distinct brand approach.
This step solidifies your concept and defines what success looks like. You’ll walk away with:
Will you build a native iOS app, Android app, or a cross-platform solution? Each has its pros and cons, and the platform you choose will affect your timeline, budget, and audience reach. Ultimately, you want to base your decision on where your users are, how fast you want to launch, and what features you’ll need.
If you’re unsure about any of these decisions, look to your app developers — they’re ready to offer their experience and perspective. Once the concept is firm, you will move on to Phase 2.
Design is very important when it comes to apps. If you craft the right look and feel it can happen quickly, or it can take a little longer to get the details right. You, the decision-maker, will work with your team to:
What does the design process yield?
The design stage is crucial for an impactful and accessible UX design and UI design. Your app needs to stand out amidst hundreds or more competitive apps. The way it looks is as important as the way it feels. By making your app beautiful to look at and easy to use, you’ll grow your customer satisfaction and gain user loyalty.
Graphic designers are in charge of creating a visually appealing experience for the user. Help your graphic designers in the early stages by supplying them with user research along with your personal preferences. Your preferences might not align with your target audience, but they are still important; you should be proud of your project and excited about where it goes. Using their first-hand experience, your design team can advise on why your project should follow or avoid certain directions. Additionally, wireframing and design mockups will guide your development team to best optimize their work downstream.
Finally, all these ideas and requirements are transferred into a polished, user-friendly interface. All the colors, typography, iconography, and branding elements, as well as a refined user experience, should start to take shape. Based on those earlier wireframes and rough mockups, designers will create high-fidelity mockups and interactive prototypes that reflect how the final product will look and function. By the end, the design should be development-ready, with clear design systems and assets that align with your app’s goals and target audience
In our experience, this Design phase takes up to 4 weeks. If the app is simple in nature, then it can happen much more quickly.
Planning any type of software application takes time. Schedule each task in the project to see where you can be more efficient with your time and budget. As with any complex project, some tasks can get done in advance while others must follow a step-by-step order.
For example, you can work the app’s icon throughout the project. Use a “dummy” icon in the interim — sometimes the appearance of the app changes over time as the architecture evolves. Developing an overview and the specific plan is critical to staying on budget and completing the app successfully.
Once you’ve developed the plan and accepted it, building the architecture can begin. The framework includes:
This is the highly technical part of the process, particularly if the app needs to integrate with other APIs and technology.
What comes out of the development stage?
This is the core of the app creation process, and most of your mobile app will be complete at this point. Resulting from development, you’ll also get the chance to interact with prototypes at represent how your app will look and feel once it’s delivered in full.
Setting up the development environment is the coding foundation for the team to build, test, and deploy the app. This includes selecting the appropriate tech stack — programming languages, frameworks, and tools — based on the app’s platform (iOS, Android, or cross-platform). Developers configure version control systems (like Git), set up local and staging environments, and integrate essential tools for continuous integration and deployment (CI/CD). A well-prepared environment streamlines collaboration, reduces bugs, and speeds up the overall development timeline.
The frontend is what users will see when they use and navigate your app. To make it a smooth flow, you need to understand cross-browser compatibility. In the past, a CSS stylesheet and a Java file in the HTML were enough.
Now, frontend developers must know browser-specific quirks and how to work around them. Think about all of the screen sizes and browser types —you can imagine that building the frontend is not as simple as it may sound.
The backend is the code and technical functionality that makes your app tick. Think: server-side, database work.
Programming takes the longest amount of time — it is intensely detailed and must be checked for bugs and errors along the way.
Imagine building a structure on a base full of faulty pieces of wood. Before too long, small problems will emerge and morph into larger problems, causing the structure to eventually topple. Similarly, if one part of your app’s codebase is faulty, then any later development will build upon an unstable structure.
If you need to speed up the project, you can use more than one developer at this stage. However, adding new IT people so late into the project can inadvertently slow you down as they get up to speed. Ask your team for guidance on the best way to staff your backend development.
Integrating third-party services allows your app to leverage external tools and features without building them from scratch. Think payment portals (like Stripe or PayPal), authentication providers (such as Google or Apple Sign-In), or analytics platforms (like Firebase or Mixpanel). During integration, developers implement APIs, configure keys and permissions, and ensure secure data handling. It’s also important to test how these services interact with your app under different conditions. Poorly integrated third-party tools can cause crashes, data issues, and frustrate app users. Done right, third-party integration enhances functionality and user experience while saving time and resources.
Continuous testing and a structured feedback loop are vital to catching issues early and keeping development on track. This is not one stage in the development phase but happens throughout the build, as developers run automated and manual tests to check functionality, performance, and usability across devices and operating systems.
The continuous testing includes unit testing, integration testing, UI testing, and regression testing. As new features are added, testing ensures they don’t break existing ones. At the same time, regular demos and test builds are shared with stakeholders for feedback, which is then “looped” back into development. This cycle helps the team make changes quickly, fix bugs fast, and continuously fine-tune the app before launch.
This stage is when you test every component in every direction from end to end. Even though your team is reviewing the UI, UX, frontend, and backend as they develop them, issues may arise that can’t be seen until all elements are put together and tested. Test all features using test exercises. They should expose any weak areas or glitches to set up for corrections.
Types of Testing
These aren’t different types of tests to choose from, like taking the ACT instead of the SAT. These are layers of testing to run your app through to ensure a high-quality product that is stable, functional, user-ready, and, ultimately, ready for launch.
Unit testing is the first line of defense, focusing on individual components or functions to verify that each part performs as intended in isolation. It helps catch low-level bugs early and ensures your codebase is reliable from the ground up.
Integration testing follows, checking how different modules work together — such as how the frontend interacts with the backend or how third-party services integrate with your system. This helps identify data flow issues, broken APIs, or miscommunications between components.
System testing is where the entire app is evaluated as a whole in an environment that mirrors real-world use. This stage tests everything from user interface and performance to network behavior and security, simulating full workflows to uncover end-to-end problems.
Acceptance testing ensures the app meets business requirements and user expectations. This is often conducted with stakeholders or beta users to provide real-life use cases and determines whether the app is ready for release.
At this stage, you’ll need to rely on two types of testers: alpha and beta.
Alpha and Beta testing will help you learn if the app can handle multiple users at the same time. Load and performance testing will ensure that the app is error-free before it’s launched. Make sure that the testing takes place on different devices and browsers to reflect your users’ experiences.
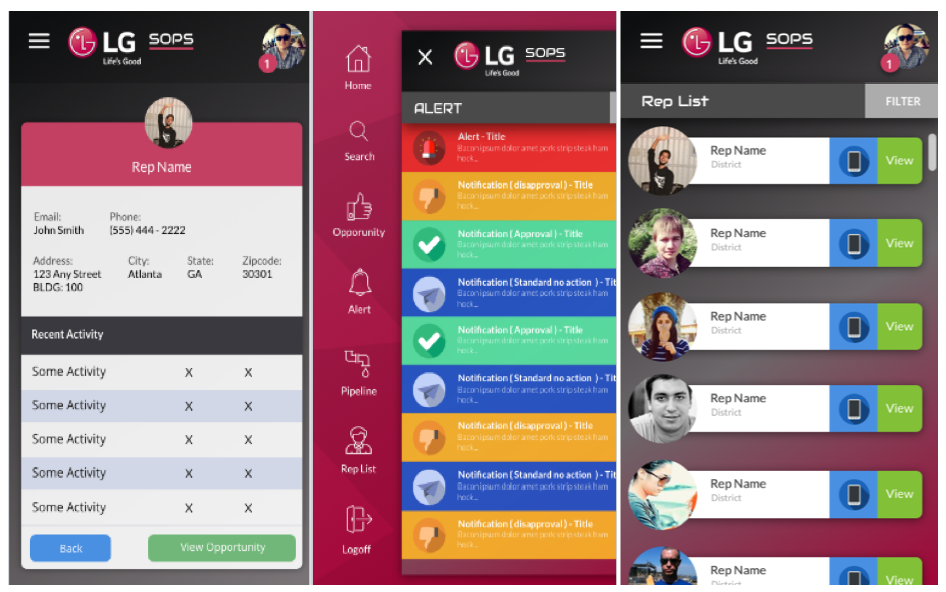
For example, this was a custom mobile app built for LG’s internal sales team to view sales opportunities and real-time internal reviews and approvals.
Take your time to determine if your app team has maintained the integrity of the original specs and the final product’s user experience satisfies your needs. Note any performance or visual issues not caught during the team’s testing. A second look will help you find and correct any remaining bugs before your app is publicly released.
Bug fixes and revisions are a final, iterative process to refine the app before launch. As issues are uncovered through unit, integration, system, and acceptance testing, developers prioritize and address them based on severity — fixing crashes, broken features, UI inconsistencies, and performance bottlenecks. Each fix is retested to ensure it doesn’t introduce new bugs, a process known as regression testing. Simultaneously, user testing and feedback may prompt design or functionality tweaks, which are also implemented and reviewed. This stage is all about tightening the product — resolving problems, polishing features, and ensuring the app runs smoothly across all intended devices and platforms.
What comes out of the final stage of the development process? Your minimum viable product (MVP)! At this point, you're ready to move to product deployment.
The deployment phase begins with preparing your app for release to the public. This is via the Apple App Store, Google Play Store, or both. To get your app into these mobile storefronts, there are some steps you need to follow:
To be ready to submit your app to the stores, you’ll need to compile the final build, create a developer account if you haven’t done so already, and set up your app store listings. Your store listing requires you to provide metadata, the app name, description, keywords, screenshots, category, and age rating. Once submitted, Apple typically conducts a manual review process, which can take a few days. Google’s review is faster but still checks for policy violations.
To avoid delays or rejections, it’s crucial that your app complies with each store’s guidelines. Apple enforces strict rules around user privacy, app performance, and UI consistency. Google’s policies equally emphasize security, as well as proper use of permissions and ad behavior.
Review each app store’s guidelines thoroughly before submission. Common mistakes to avoid include using unsupported features, requesting unnecessary permissions, or having incomplete metadata. Ensuring your app is stable, secure, and transparent with user data will improve your chances of approval.
Your app can finally get into the hands of users! Before you hit “submit,” be sure you have everything else you need for a successful launch. Coordinate your app marketing and social media efforts to build momentum. Consider a soft launch or beta release to gather early feedback and resolve any final issues. This stage is about more than going live with your launch — it’s about making an impact. Have support channels ready and monitor app performance and user reviews closely post-launch — your next and final phase.
Your app is launched, it’s live in the app stores, and it’s time to celebrate! Go easy on the champagne because after your app goes live, your work isn’t over. In this post-launch phase, it’s critical to monitor app performance, listen to initial user feedback, and be ready to make updates and changes as needed.
Now that your app is live, the training wheels of the testing environments are off, and it’s time to see how it performs in the real world. You want to closely track app performance using analytics tools like Firebase, Mixpanel, or App Store Connect to monitor key metrics such as user retention, crash reports, session length, and in-app behavior. These insights help you spot issues early, identify user drop-off points, and understand which features are driving engagement — or falling flat.
Monitoring performance ensures your app is aligned with user expectations. User feedback is one of your most valuable tools for directly gauging these expectations. Encourage reviews in the app stores and collect feedback directly from users through in-app prompts, surveys, or customer support channels. Analyze this feedback for patterns — are users struggling with navigation? Are certain features missing the mark? Understanding what users love (and what frustrates them) helps prioritize future improvements and needed updates, while building a loyal following by showing users their voices are heard.
App performance and user feedback should inform the type of updates and improvements that are needed. Schedule regular updates to fix bugs, optimize performance, and add new features. As operating systems and devices evolve, your app must adapt to remain compatible and secure. Regular updates and ongoing maintenance aren’t optional — they are what will keep your app competitive, relevant, and trusted by users over time. Your post-launch success depends on your ability to keep improving!
In my experience, mobile apps can take anywhere from 3-9 months from conception to completion. However, any project’s timeline and costs are determined by its scope.
Factors affecting your timeline can include:
A very simple app will have fewer than 10 screens and easy coding logic. A complex app includes:
The more complex you expect your app to be, the more time and money it will take to develop it.
In app development, team size matters, but so does their experience. You need to have the right balance of the two, or else you may end up with an ever-evolving timeline.
A small team may be agile, but they can only accomplish a set amount of tasks at once. A larger team can handle multiple development tracks simultaneously (e.g., frontend, backend, testing, and design), accelerating overall progress. However, if not well-managed, a big team can also lead to communication breakdowns, overlapping responsibilities, and integration issues.
If you need to keep the team small, this is where experience can come into play. A smaller team made up of veterans can drastically reduce development time and launch a quality product. Experienced developers know the common mistakes to avoid, write cleaner code faster, and make better architectural decisions from the start. They also understand organizational challenges and needs, can optimize workflows and streamline testing.
For on-time app development, ensure you have a team with the right mix of experience and size, aligned appropriately with the app’s scope, timeline, and budget.
If you’re working on a limited budget, this can, in turn, limit the development resources, team size, and features of your app. Working with a leaner team, relying on slower development cycles, or cutting back on advanced features can all extend the time it takes to reach a finished product.
A tight budget can mean prioritizing an MVP (minimum viable product), focusing on core functionality first and delaying non-essential features to future updates. Going with off-the-shelf solutions instead of custom builds can save you time and money, but require trade-offs in flexibility and performance.
Ultimately, you’ll have to decide where to save, what to cut, and what concessions you’re willing to make in the great time vs money vs product triangle.
Changing requirements during app development can significantly extend the timeline, especially if they occur mid-sprint or after major components have already been built. Every change — whether it’s a new feature, altered workflow, or shift in business goals — can trigger a ripple effect, requiring redesigns, code rewrites, additional testing, and sometimes reworking backend infrastructure. Multiple changes can start to disrupt momentum, confuse priorities, and increase the risk of bugs or technical debt. Changes are to be expected and the team needs to be agile and flexible to meet them, but uncontrolled scope changes can delay delivery, inflate costs, and burn out the development team. Clear, upfront planning and a structured change management process help keep timelines on track.
As mobile devices continue to grab the lion’s share of the computer software market, app development can help take your company to a new level of success. Since it is often a lengthy process, consider working with an experienced app development company to guide you through every step.